Creating quick prototypes using PowerPoint
March 3rd, 2017
I was recently faced with a dilemma. I needed to create a prototype to demonstrate some proposed changes to their menu flow. There were some caveats though. Firstly, we needed to present these remotely as the client was located abroad. We also needed to get the first version to them as quickly as possible. And finally, any software we used had to be approved by their legal team first.
With a tight deadline, we couldn't wait for their team to review and approve one of our regular tools of choice such as UXPin or Axure. Static sketches were fine, but fell short when communicating the flow and were difficult to share.
It turns out the solution was in my taskbar all along. Let me share with you some quick and easy steps to begin prototyping in PowerPoint.
Why PowerPoint?
Obviously with more prototyping tools around than you can shake a stick at, it’s easy to discount the power - excuse the pun - of something like PowerPoint. However, given that everyone and their mum has had some experience with it, PowerPoint means anyone can get down and start working with it. It can also be shared easily between teams.
Like any good prototyping tool, PowerPoint is already primed with a large selection of shapes, and adding media couldn’t be easier. This means that putting together a simple screen can be done in minutes.
PowerPoint may not be the best option if you’re prototyping a particularly complex system as you can’t define a slide structure; you can’t nest one page under another, for instance. Also if your prototype needs to demonstrate complex interactions or animations there are plenty of purpose-built tools to handle this.
Getting started
Before getting into creating your screens, it’s worth doing some rough planning first. We sketched out all our potential user flows on a whiteboard as a team to understand what would need to go into PowerPoint, and which screens would be linked.
As with any whiteboard task, this allowed us to very quickly iterate on the flow and look for anyway to streamline it. It also meant that I had checklist of the screens I needed to create, and a good idea of what needed to be linked, and to where.
Create and organise your screens
The first task I did when beginning prototyping was to create all the screens needed. I added a title to each slide so that as the prototype grew in complexity, I could quickly find each screen (this is particularly useful when setting up your links).
I also grouped each of the different sections of the prototype together. To do this:
- 1. Right-click on the first slide of a given section
- 2. Select Add Section
- 3. Right-click on the section heading you just created
- 4. Select Rename Section and name it accordingly
Sections can be collapsed and expanded which makes keeping track of all of your screens easier.
Lay out your content
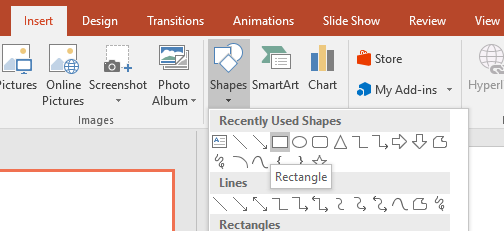
With all of your pages created, it’s time to start adding the content. PowerPoint’s Shapes menu (accessed via Insert > Shapes) is likely to be the most useful for this.
Something I found handy was to create a set of reusable UI components that I can copy and paste throughout the prototype. You can group elements together using Ctrl + G which makes this even easier.
For us, we were much more focused on the actual flow between screens so I deliberately kept this as high level as possible, sticking mainly to gray boxes and minimal detail.
Add links and hotspots
The real magic happens when you start linking your screens together as static wireframes become working prototypes. You can add a link to any element you’ve dropped onto a slide.
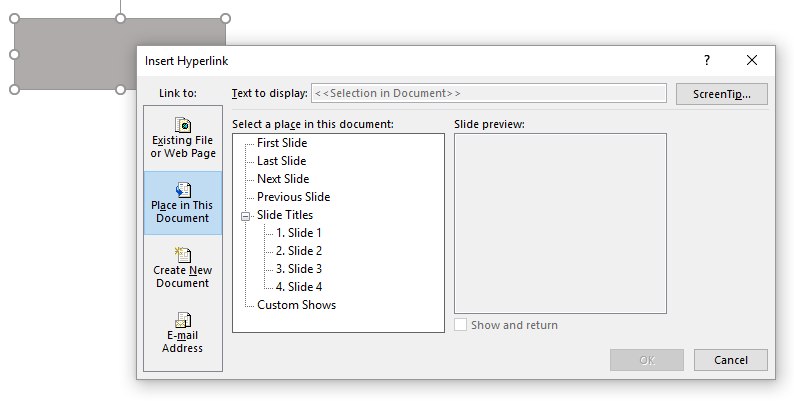
To set up a link:
- 1. Right-click on the element you want to add a link to
- 2. Select Hyperlink
- 3. Select Place in This Document
- 4. Select the page you want to link to
If you’ve added titles to each slide, you’ll see these handily noted here. There are also slide previews which make this job easier.
Enable Kiosk Mode
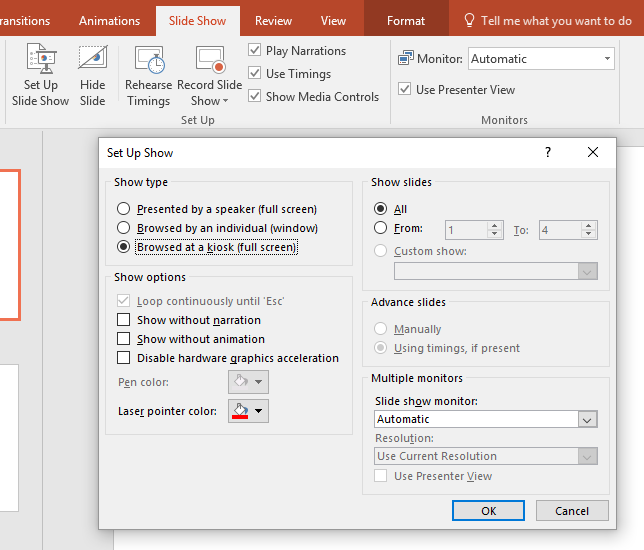
Kiosk Mode is a feature in PowerPoint that disables mouse and keyboard inputs from moving the slideshow along. This means when we set up hotspots in the prototype, only these will be clickable.
To turn on Kiosk Mode:
- 1. Select Slide Show from the menu bar
- 2. Select Set Up Slide Show
- 3. Under Show Type, select Browsed at a Kiosk
Now only the links you set up initially will be interactive, preventing inquisitive users from just scrolling through your entire prototype.
Share, test and iterate
As with any prototype, the most important part is getting it out there to the intended audience. For us this initially meant our stakeholders who could click through it and understand the design we were proposing.
PowerPoint prototypes can also be easily put to usability testing and allow for rapid iteration. Because PowerPoint is such a common tool, even non-designers can make changes based on feedback allowing for just about the most rapid iteration you could hope for.